Fitting your decking rope made easy
Decking rope doesn’t have to be difficult to install by yourself. At ropelocker, we’re experts in fitting cups, brackets, and more and know how to get a perfect fit every time.
Here’s our tips for doing it yourself.
HOW TO CUT YOUR DECKING ROPE
We always recommend putting masking tape around your rope before cutting it. Ensure you wind plenty of layers around tightly. This helps to keep the strands together and stops you getting a frayed end. Masking tape is the perfect material as it won’t melt when heated or damage the rope.
Serrated knives cut through the rope fastest and cleanest. However, the sharper the knife the better. Try rolling the rope and cutting through each strand at a time to make it easier.
DO I NEED TO SEAL THE ENDS OF MY ROPE?
If you’re using our synthetic decking rope, it’s always worth melting the ends. This will stop your ends from fraying and will help your decking rope last much longer.
At ropelocker, we use a hot knife to seal the ends. These are a great investment if you’re going to be cutting lots of lengths of rope.
Alternatively, you can use a heat gun (paint stripper style) to heat up the ends and melt them. You only need to use it on a low setting.
If you’re working with a smaller rope, using a flame to melt the ends will work fine. We recommend doing this outside as this is likely to produce a lot of smoke, but try to find a sheltered place out of the wind.
While the rope is still warm, roll it and squeeze the ends (careful not to touch the melted ends). This will make your rope slightly more compact, and will save you a lot of stress trying to squeeze your rope ends into fittings.
If you’re working with a natural rope, these cannot be hot cut or melted, but there’s other ways your rope can be protected. Adding heatshrink or whipping twine to bind the ends can limit fraying and help your rope to last longer. Just bear in mind that adding a layer of whipping twine or heatshrink will make your rope thicker, so make sure you have plenty of leeway if you’re planning to add fittings (like cup ends or hooks) or if you’re threading your rope through holes in your posts.
HOW TO PREP YOUR ROPE FOR FITTINGS
Before fitting anything, take a moment to check where you’d like any cups, hooks, brackets, or caps on your rope.
Simply place your fitting on your rope (without the screws in) and clearly mark the two points you’ll need to drill through your rope. It’s best to mark your points on the strands rather than in between, as it will be much more difficult to precisely drill through the latter.
Here at ropelocker, we find it best to use a soldering iron to melt a hole through your rope. This is an easy method that ensures your hole isn’t going to fray or move over time. A cheap soldering iron can be purchased for around £15 and will save you a lot of time.
If you haven’t got access to a soldering iron, you can just drill through your rope. A high power drill will cause enough friction to slightly melt the rope due to the heat.
Before screwing your fittings into place, it’s worth putting a screwdriver through the hole in your rope just to check there are no blockages.
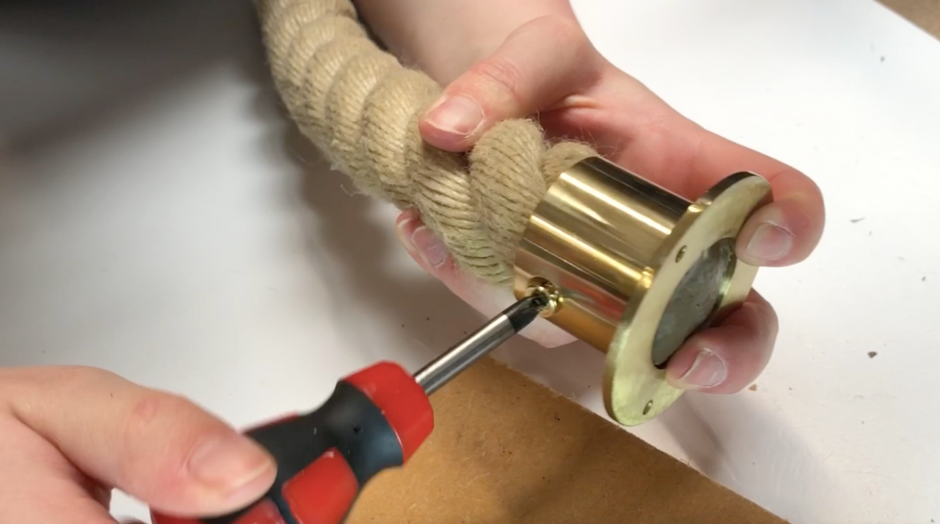
FIXING YOUR FITTINGS
Once your rope has cooled, remove the tape. You can now slip your fittings onto the rope and screw into place.
Sometimes you might find that the screw doesn’t perfectly line up. Just give your fitting a bit of a wiggle, be patient, and the screw should line up with your holes.
Double check that everything looks clean and lines up nicely. For example, if you’re fitting a cup end, make sure that the end of your rope lines up with the base of the cup end and isn’t sticking out. Otherwise, when you go to screw your cup end to a wall or a garden post, it won’t lie flat against the surface of the post.
MAKING ADJUSTMENTS
If you have a specific length and you find your finished rope is slightly long or too short, this is easy to fix. Simply by twisting or loosening up your rope you’ll be surprised how much you can alter the length.
While hardy hemp rope doesn’t have tonnes of stretch to it, it does have enough to allow you to resize your rope if necessary. It’s also worth remembering that hardy hemp often stretches as we pull it out to measure in our warehouse (which is why we often cut our customer’s ropes a little over). By the time the rope reaches you, it may well have shrunk slightly in transit. But don’t worry – all you need to do is give it a firm tug and it will spring comfortably back into place.
This can make all the difference if you’re trying to add some droop or some shape to your decking display. But if you would like some further advice about adding droop to your rope (and calculating how much you need), we have a blog post you can read here.
Here’s a link to our full decking rope tutorial on Pinterest. Feel free to pin our vid – you can save it for when you order some decking rope from us. Then, when you’re ready to install the rope in your garden, you can just follow along!
If you would like some more guidance on installing decking rope, get in touch with us today. And if you’d like us to attach your fittings for you, we will happily do this. Visit our contact page and we’ll get back to you as soon as possible.